Restoring a Database |

|

|

|
|
Restoring a Database |
|
|

|
Restoring a Database |
|
|
|
|
Restoring a Database |
|
|
|
|
|
||
You can associate a new database with an existing version of Skyline. This is a useful action when you need to test a problem with a customer's data. This will add a new database and not overwrite an existing database. Make sure that the Skyline version of the original database and the new database to be associated are the same.
To restore a database:
| 1. | You need to confirm the physical location of your Skyline website. To do this open Internet Information Services (IIS) Manager.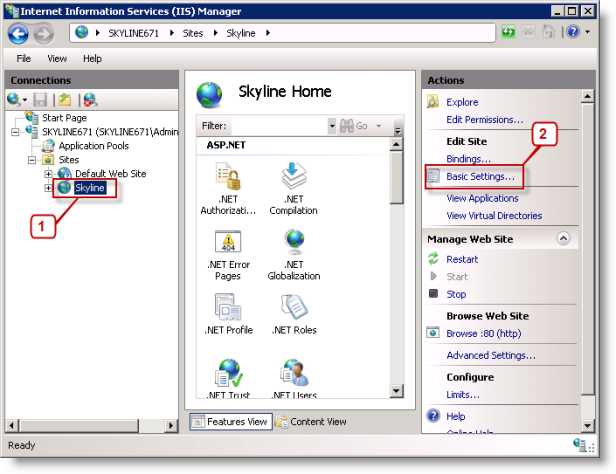 |
| 1. | Select the Skyline website. |
| 2. | Click Basic Settings. |
| 2. | The Edit Site window opens.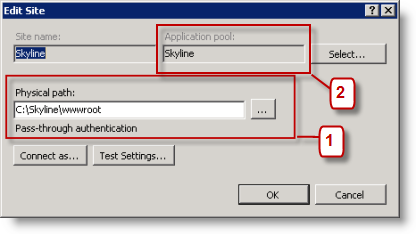 Make a note of: |
| 1. | the physical path of the website. By default it is C:\Skyline\wwwroot. |
| 2. | the name of the application pool that the website uses. This is needed during an upgrade procedure. |
| 3. | View the Skyline website folder and open the web configuration file with notepad. |
| 4. | In the <connectionStrings> section identify the server name and database name. In the example below the server name is .\Skyline.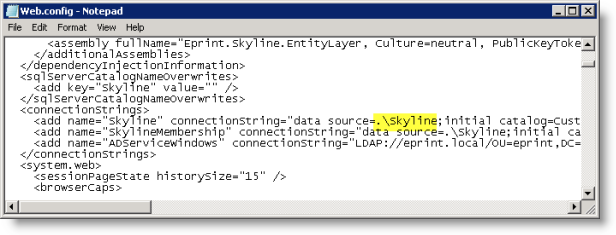 Make a note of the following: |
| • | Data Source (This is the name of the SQL Server where the database is stored). |
| • | Initial Catalogue (The name of the Database) |
| • | Username |
| • | Password |
| 5. | Copy your backup files onto the SQL Server where the new databases will be created. |
| 6. | Open SQL Server Management Studio. The server name is the name of the SQL server stated as the data source in the web.config file.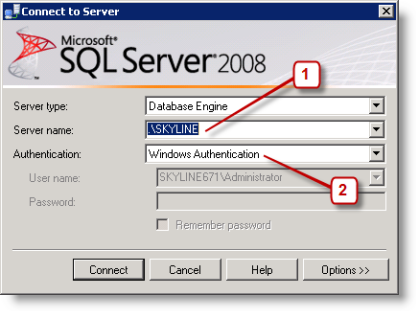 |
| 1. | Enter the name of the SQL Server |
| 2. | Select the authentication type Windows Authentication or use your SA account log in. |
| 7. | Two new databases are going to be added (one containing the data and one the membership details). Once the databases have been created the backup data can be installed into the new databases and then these can be made you default databases. It is not recommended that you perform a restore directly into your existing databases.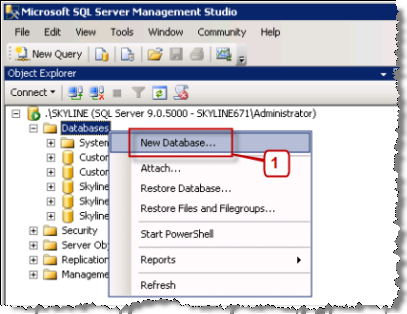 |
| 1. | Right mouse click Database, select New Database. |
| 8. | The New Database window opens. Select the page General.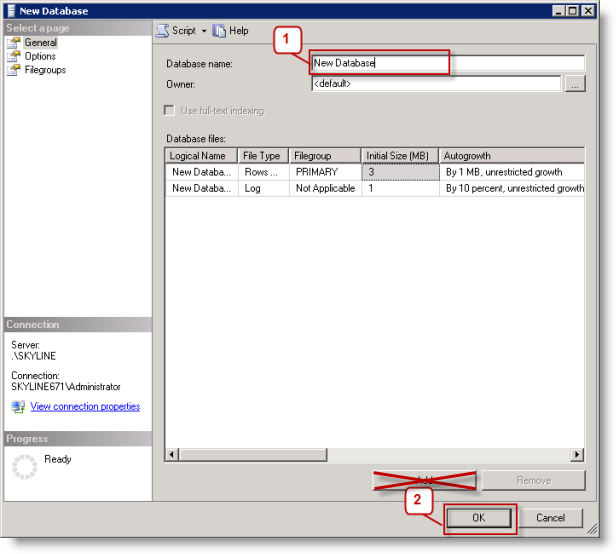 |
| 1. | Enter the new database name [no spaces in the name]. DO NOT click Add. |
| 2. | Click OK. |
| 9. | You need to create another a new database to restore your Skyline Membership backup into. Right mouse click Database, select New Database. |
| 10. | The New Database window opens. Enter a name for the new Skyline Membership Database then click OK. |
| 11. | You are now ready to restore your backup database into your new database. Right mouse click the new database, select Tasks, select Restore, click Database. 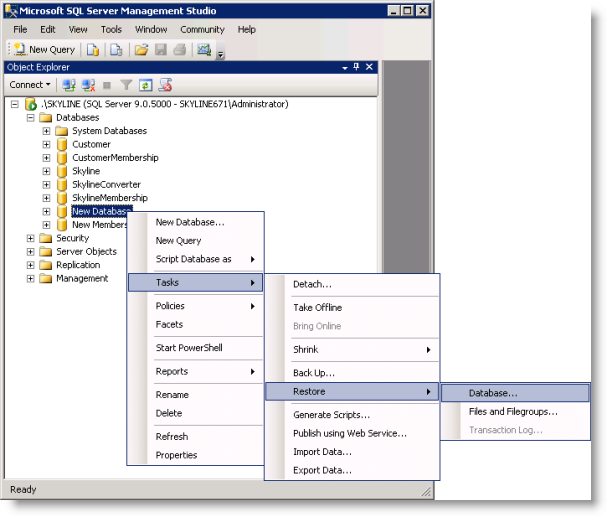 |
| 12. | The Restore Database window opens. 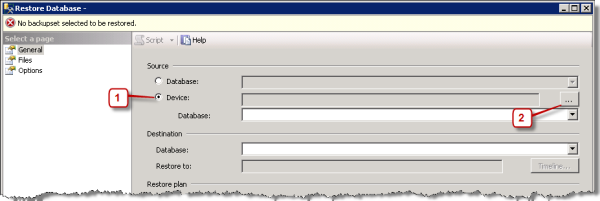 |
| 1. | Select Device. |
| 2. | Click Browse. |
| 13. | The Select Backup Devices window opens. 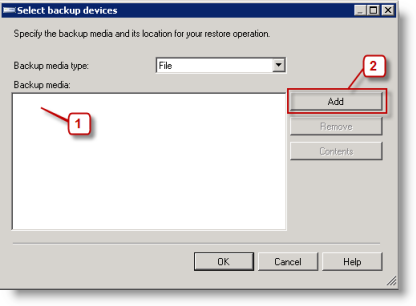 |
| 1. | There should be no backup media listed. If there are any listed select them and then click Remove. |
| 2. | Click Add. |
| 3. | Select the location of the Skyline.bak file that you copied earlier. The file is listed 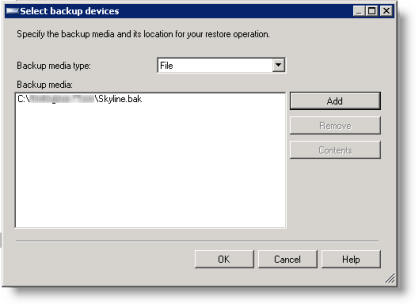 |
| 4. | Click OK. |
| 14. | You return to the Restore Database window. As you are adding an additional database & not replacing the existing database you must NOT accept the restore defaults.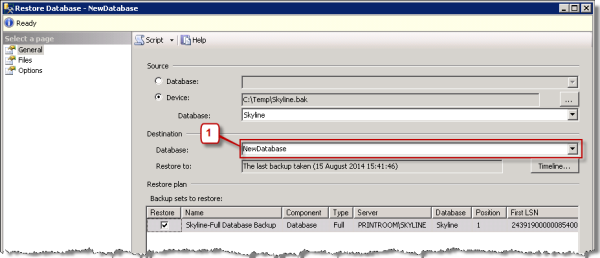 |
| 1. | Change the Destination Database to the new database name. |
| 15. | Select the page Files. You need to set the location of the database files.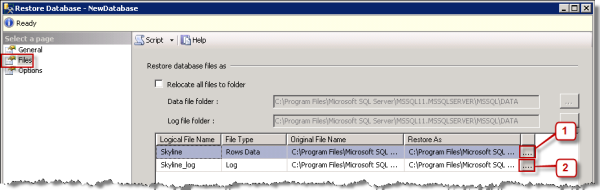 |
| 1. | Click browse the locate the new mdf data location. |
| 2. | Click browse to locate the new ldf data location.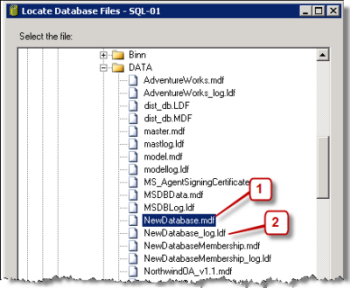 |
| 16. | Select the page Options. The restore process can be started.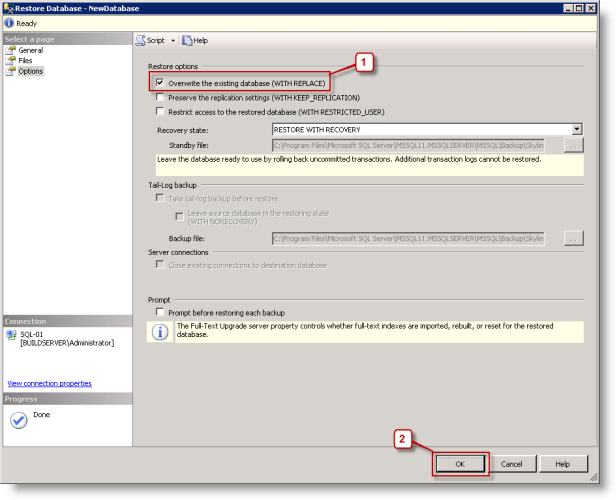 |
| 1. | Select the restore option "Overwrite the existing data (WITH REPLACE). |
| 2. | Click OK. When the database has been restored you will see confirmation of the restore.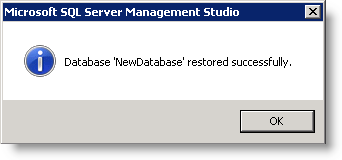 |
| 17. | You are returned to the Microsoft SQL Server Management Studio window. The membership database needs to be restored. Right mouse click the new membership database, select Tasks, select Restore, click Database. |
| 18. | The Restore Database window opens. |
| 1. | Select Device. |
| 2. | Click Browse. |
| 19. | The Select Backup Devices window opens. |
| 1. | There should be no backup media listed. If there are any listed select them and then click Remove. |
| 2. | Click Add. |
| 3. | Select the location of the SkylineMembership.bak file that you copied earlier. The file is listed 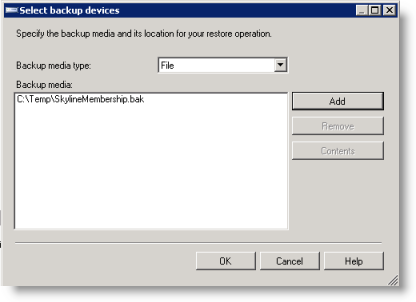 |
| 4. | Click OK. |
| 20. | You return to the Restore Database window. As you are adding an additional database & not replacing the existing database you must NOT accept the restore defaults.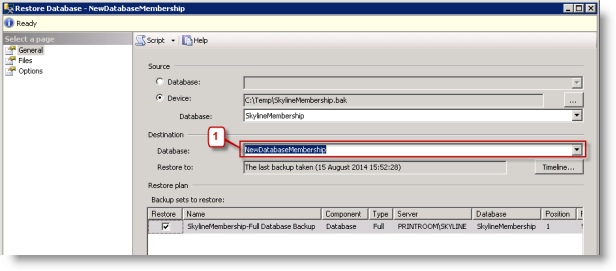 |
| 1. | Change the Destination Database to the new membership database name. |
| 21. | Select the page Files. You need to set the location of the database files.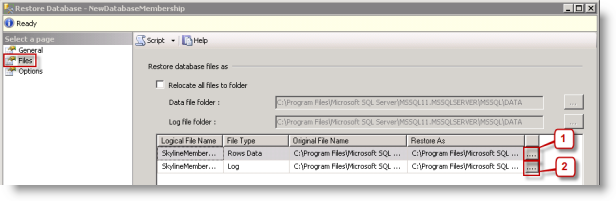 |
| 1. | Click browse the locate the new mdf data location. |
| 2. | Click browse to locate the new ldf data location.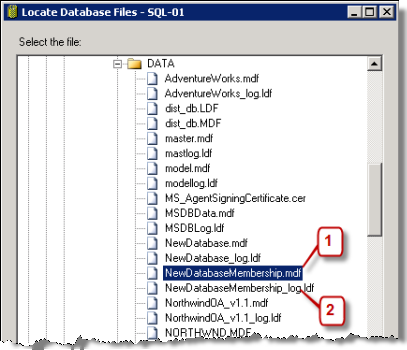 |
| 22. | Select the page Options. The restore process can be started by selecting the restore option "Overwrite the existing data (WITH REPLACE). |
| 23. | Click OK. When the database has been restored you will see confirmation of the restore. |
| 24. | When the database was restored the log on details for the user Skyline were also restored. As you will want to use your existing Skyline log in details the restored Skyline user details need to be deleted in both the NewDatabase and NewDatabaseMembership databases.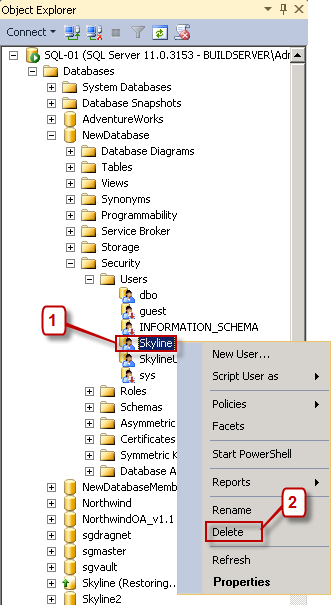 |
| 1. | Locate the user Skyline in the NewDatabase [Databases - NewDatabase - Security - Users] |
| 2. | Right mouse click the user and select Delete. |
| 3. | Locate the user Skyline in the NewDatabaseMembership [Databases - NewDatabaseMembership - Security - Users] |
| 4. | Right mouse click the user and select Delete. |
| 25. | Your existing Skyline user needs to be mapped to the NewDatabase. 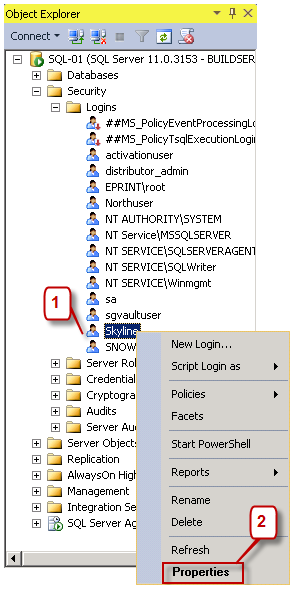 |
| 1. | Locate the Skyline Log in [Security - Logins] |
| 2. | Right mouse click the Skyline user and select Properties |
| 26. | The log in Properties - Skyline window opens.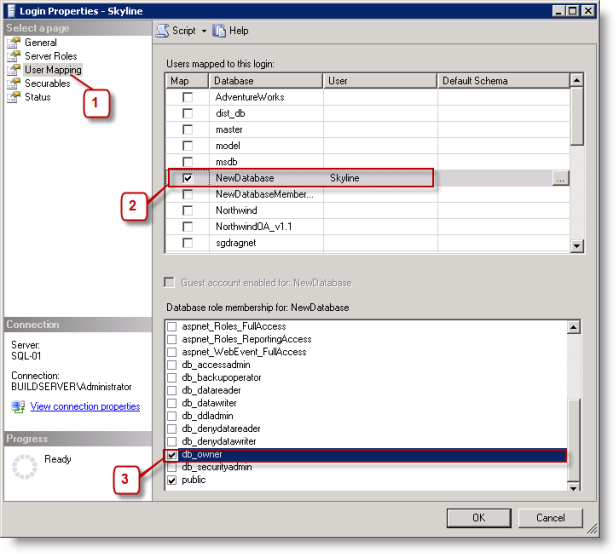 |
| 1. | Select User Mappings. If you get the message "One or more databases are inaccessible and will not be displayed in list" click OK. |
| 2. | Select the option to map to the NewDatabase. |
| 3. | Select the database roll membership for the NewDatabase as db_owner. |
| 4. | Select the option to map to the NewDatabaseMembership. |
| 5. | Select the database roll membership for the NewDatabaseMembership as db_owner. |
| 27. | View the Skyline website folder and open the web configuration file with notepad. |
| 28. | Find the <connectionStrings> section.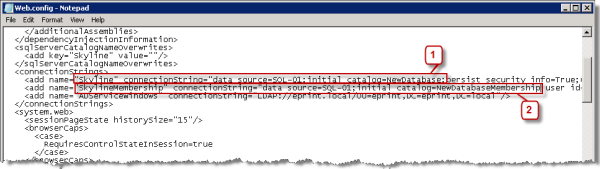 |
| 1. | Change the initial catalog name to the new database name for Skyline. |
| 2. | Change the initial catalog name to the new membership database name for SkylineMembership |
| 29. | Restart the website by entering the command IISRESET at the command prompt on the Skyline server. |
| 30. | Open a web browser on the web server and enter the address http://localhost.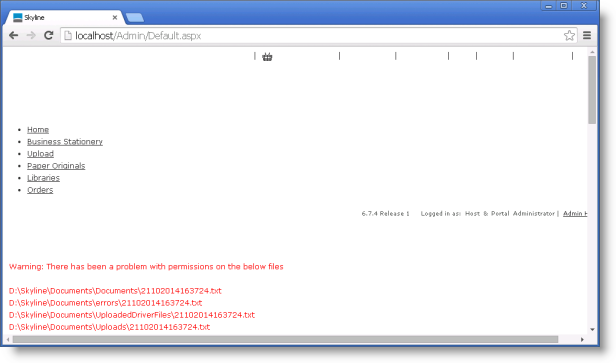 You need to make the following changes: |
| 2. | Change the directory locations for documents. This directory locations that need to be reset are indicated by the warning message. |
| • | Open the list of portal Default Configurations in the Admin page and update; Document Directory Document Error Folder diver.directory Upload - Directory |
| 3. | If you want to use PrintStation with the new database you will need to associate a PrintStation with the new portal. |
| 4. | Add a user and assign roles, if required. |
| 5. | Amend the email settings, if different. |
| 31. | Restart the website by entering the command IISRESET at the command prompt on the Skyline server. |