The Smart Calendar option enables you to set the maximum number of pages that can be printed by the print room for each day. This means that the print room should not receive more orders than they are able to produce as users are only able to select a delivery date where there is still capacity to produce the order. You are also able to select the days that the print room operates and set a different print level for specific days. This could be especially useful if there is reduced capacity on a specific day due to a printer being serviced or a public holiday approaching.
The Smart Calendar will be displayed to the user when they place their order on the confirmation page.
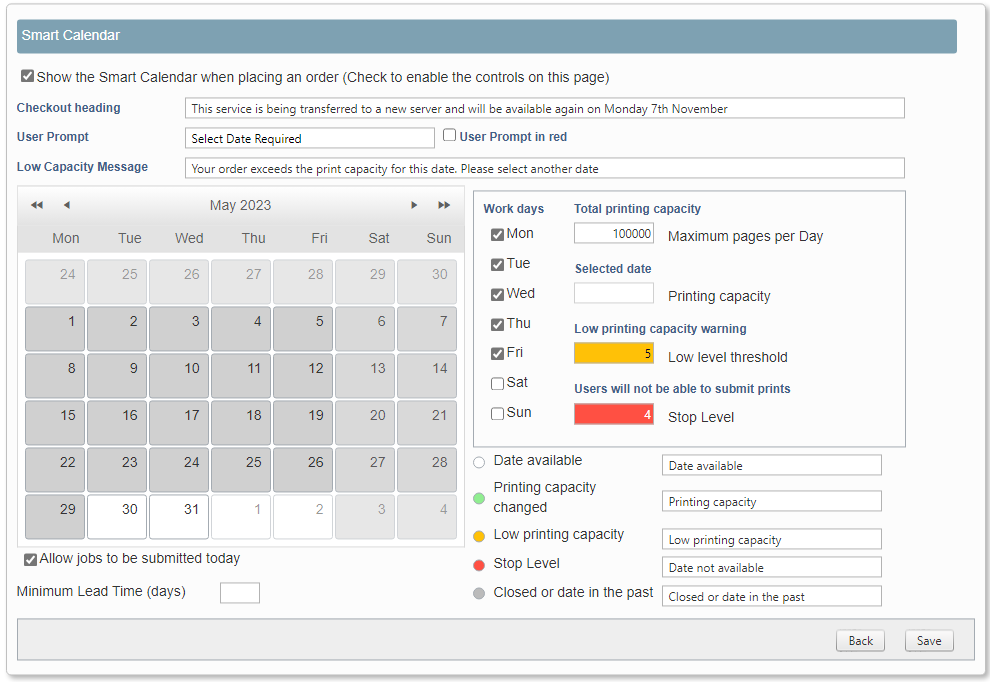
Example showing the Smart Calendar on the Confirmation page. Until a date is selected the order cannot be placed.
Note: If you are using the Smart Calendar you should not use a calendar in your delivery form created in ProductManager.
To configure the Smart Calendar:
1.
Log in with Administrator rights and go to Admin.
2.
In the Orders section click Smart calendar.
3.
The Smart Calendar configuration form opens.
1.
Select the option to Show the Smart Calendar when placing an order. You will now be able to amend the controls on the page.
2.
Amend the checkout heading (optional).
3.
Amend the User Prompt if required and select if you want it to be displayed in red text.
4.
Enter a low capacity message.
5.
Select the appropriate work days for your print room. By default the option to allow jobs to be submitted for the current date is selected. If you remove the selection users will not be able to place an order which is required on the current day.
6.
Enter the Printing Capacity levels as required.
If you are closed on particular dates, for example for a public holiday, you can prevent orders being placed for delivery on those dates by selecting the date and setting the maximum prints for the day as being Zero. If you set a printing level to zero the date is greyed out and cannot be selected.
You can enter a value in the stop level if required. This will create a buffer zone in the PrintStation to allow for special orders to be printed if needed.
7.
Amend any messages to the user.
8.
By default the user is not able to select the date required to be the same as the date that they are placing the order. If this is allowed select the option to Allow jobs the be submitted today.
9.
Enter the number of lead days required in the field labelled Minimum Lead Time (days). Non work days are not included in the calculation. By setting a 'Minimum Lead Time (Day) you override the option 'Allow Jobs to be Selected Today'.