A new portal needs to be created as you need a portal exclusively for Network authentication. If you have only purchased one portal and need to authenticate users via LDAP, please contact ePrint Direct who will issue you with a license for a second portal.
To create a portal to be used for LDAP authentication:
1.
Log in to http://localhost with a username that has Host Admin privileges and go to Admin.
2.
In the Portals section click Portals.
3.
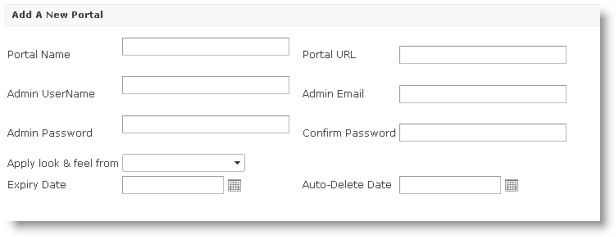
At the end of the list of existing portals there is an Add a New Portal section. Complete the fields with the details of your new portal that will be used for LDAP authentication.
•
Portal Name - A unique name for this portal e.g. LDAP.
•
Portal URL - The URL that will be used to access the LDAP portal. The Portal URL is the web address users will enter into their browser to access the Skyline portal. If you have not set up the corporate DNS server with a URL to point to this portal, enter the server's IP address in the URL field.
•
Admin UserName - Choose a username for a local user with admin rights e.g. admin.
•
Admin Email - Your email address in case you forget your password.
•
Admin Password - Choose a strong password that you will remember.
•
Confirm Password - Retype the strong password.
•
Apply look & feel from - The new portal will be a copy of an existing portal selected here.
•
Expiry Date - leave empty.
•
Auto-Delete Date - leave empty.
4.
Click Submit when all the required information is entered.